One of the cool features of the
HPCC platform is its ability to
extract,
transform and
load Big Data (tera bytes to peta bytes). At the core of the HPCC platform is the powerful and simple ECL (Enterprise Control Language) programming language. Part I of the ECL blog, shows you how to load data and display the contents. In essence, have the data ready for further data manipulation.
Before we begin to get our feet wet and drool over the code, it is imperative to spend a few minutes understanding the HPCC platform architecture. The following high level architecture diagram, provides you with a view of the important components:
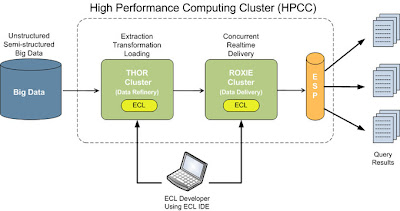 THOR
THOR - The Thor cluster performs the Loading, Extraction and Transformation of the data. It is used to load
Big Data (unstructured, semi-structured or structured), transform it and optimize it for querying.
ROXIE - The Roxie cluster is optimized to perform queries with very high concurrency. Typically, processed data from a Thor cluster is exported to a Roxie cluster to enable real time, fast and highly concurrent query processing.
ESP - The ESP provides you with a simple web services interface, that is used to access the Roxie queries.
Now back to the coding. How do we load the data? The HPCC Platform has a built in utility called ECL Watch. Data loading is one of the functions (among many) that ECL Watch provides. The following step by step tutorial takes you through the process:
1) For the sake of sanity, we will assume that you have been able to download and install the
HPCC VM. If not, please proceed to do so and read the
HPCC VM Install Guide.
2) Now download the
sample data file containing person information data- first name, last name etc. Once downloaded, extract the contents of the zip file and store it at a known location.
3) Point your browser to the ECL Watch and use the upload/download file link to upload the file to the landing zone
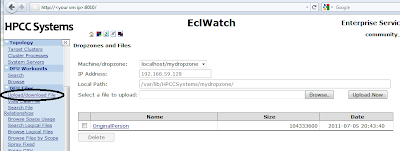
Browse to the sample person file you downloaded, select and upload.
4) Spray the file contents to all the nodes across the cluster. Again, use the ECL Watch utility to do this.
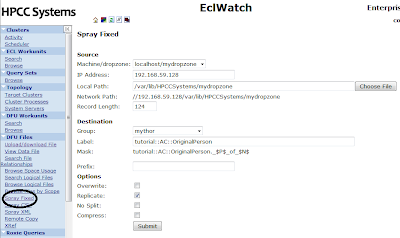
The label is a logical name, AC stands for my initials. It really can be anything. Choose the file that you uploaded in step 3, set the record size to
124 (record size of the person file) and submit for it to be sprayed.
If successful, you should see a results page that looks like:
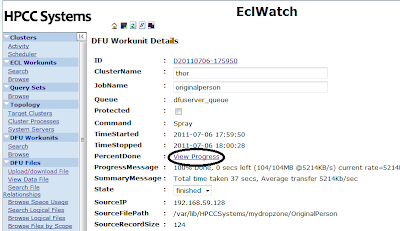
Click on the View Progress to view the progress of the spray
5) Download, install and configure the
ECL IDE if you have not done so already.
ECL IDE preferences:
Enter your VM IP in the "Server" input.
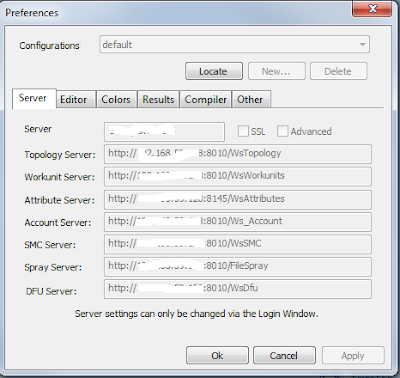
Save the preference
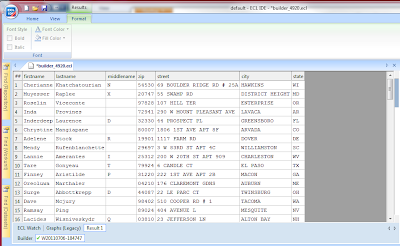
6) Now, you are ready to write ECL Code. While in the ECL IDE, press CTRL+N to open a new work unit. Type in the following code:
Layout_People := RECORD
STRING15 FirstName;
STRING25 LastName;
STRING15 MiddleName;
STRING5 Zip;
STRING42 Street;
STRING20 City;
STRING2 State;
END;
File_OriginalPerson :=
DATASET('~tutorial::AC::OriginalPerson', Layout_People, THOR);
//Here change the AC to whatever you used to name the label in step 4
OUTPUT(File_OriginalPerson);

7) Syntax check (f7) and Submit/Execute the code to see the following results
That is it for now. In my next blog post, we will be looking at some of the features of the ECL IDE and ECL Language. In the process, we will also expand upon the person example and learn about transformations, indexing and sorting.


